Every serious WordPress administrator takes care of the appearance of their website down to the smallest detail. That is why it is very important that the website menu fits into the design and brand of your website. Your menu is the main part of your website and every visitor will surely use it. That’s why today we will write how to change menu color in WordPress.
In addition, we will show you how to change some other menu attributes so your menu fits perfectly into your website.
Although the menu colors are predefined in each theme you may want to make some changes. If you don’t know how to match the appearance of the menu with the appearance of your website, then continue reading.
Table of Contents
There are several ways you can set the colors of your menu.
1. Change menu color from the theme panel
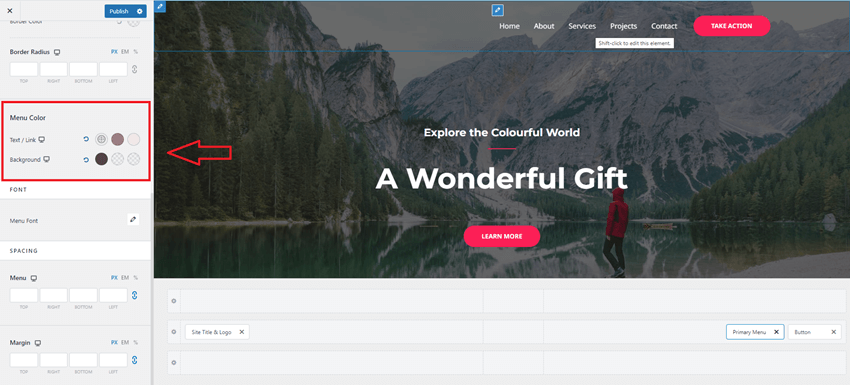
Depending on which theme you use, you should have an option to easily change the color of your menu. For demonstration purposes I am using the Astra WP theme which has all the options to customize every part of your website.
Once you are logged into your WordPress dashboard, click on “Appearance” and then on “Customize.” The WordPress menu will open, it is expanded with the options of the theme you installed. In my case, after I clicked on “Menu” and selected the menu I want to edit, the option “Menu colors” appeared. There I can easily edit most options such as menu color, size, padding and many other attributes.
2. Change menu color in Additional CSS
Most free themes do not have an advanced theme panel to adjust all theme options. The colors and appearance of the menu is predefined and you cannot change it from the theme panel. That’s why we’re going to show you how to change the colors of your menu using custom CSS code.
Before we start with this task we need to identify the name of the CSS class that is responsible for the appearance of your menu.
Here’s how you’ll do it:
– In your browser (I use Google Chrome) open your website, right-click and select the option “Inspect.”
– Place the mouse cursor on your menu, in the window on the right find the name of the CSS class responsible for your menu. Mine is called “.main-header-menu.”
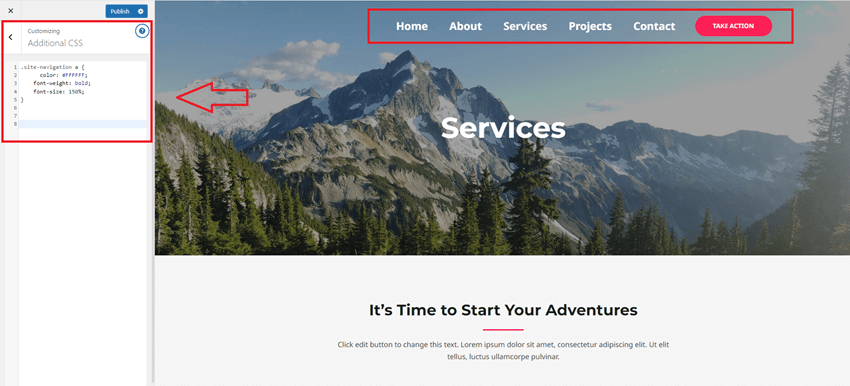
– Go to WP dashboard, click on “Appearance” and then on “Customize.” At the bottom of the left menu you will see the option “Additional CSS”.
– Click on it and enter the following code:
/* Change Menu Color*/
.site-navigation a {
color: #FFFFFF;
font-weight: bold;
font-size: 150%;
}
Instead of “main-header-menu” you need to use the name of your class, and instead of the color I added you can use any color you want. There are many online color picker tools that you can use to choose the color that suits you. The last two options are font-weight and font-size, they define the font and are not important, you don’t need to use them if you don`t want to.
3. Change menu color with simple HTML
If you are not skilled with CSS and don’t want to make any changes that way, then we will show you how to change the color of your menu in a very simple way using HTML code.
In this way you don’t have to change the colors and appearance of the entire menu, you can change only a specific item. Of course, you can also make several menu items in different colors, it all depends on your wishes.
To accomplish this task click on “Appearance” and then on “Menus.” After you have selected the menu you want to edit, click on any item within the menu.
Enter the following code in the “Navigation label” field:
<font color=”#000000;”>Menu Item</font>
You can use your own color instead of #000000. There are many online color pickers that will help you choose the color that suits you.
As you can see in the picture above, I added a different color for each menu item.
This is how it looks on our website:
We showed you how to change menu color in WordPress. If changing the color is not enough for you and you want to make some additional modifications, then continue reading. We will explain to you the easiest way to change the menu font size, how to change the font and many other font attributes.
4. Change menu font color by using custom CSS
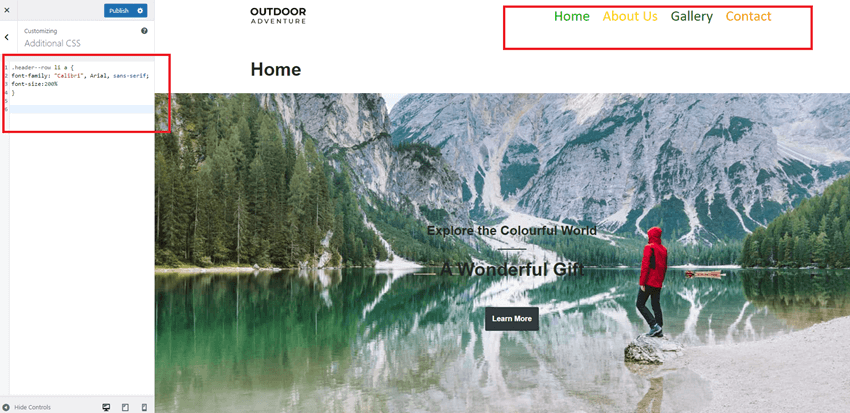
This option is very similar to changing the menu color. Click on “Appearance” and then on “Customize.” The last option in the menu on the left is “Additional CSS” and that’s the one you want.
Enter this code:
.header–row li a {
font-family: “Calibri”, Arial, sans-serif;
font-size:200%
}
You can choose any font you have installed or one of the fonts from the Google collection. For demonstration purposes I used the “Calibri” font.
It is important to note that you need to identify the CSS class of your menu and type it instead of the “header—row” we use. At the beginning of this article, we wrote how you can identify the CSS class menu.
In the image above you can see how the menu looks now:
WordPress is a very flexible CMS that allows you to change the color and menu attributes in several ways. You can use any of the methods we’ve listed to achieve the look you want for your menu. If you experiment with menu colors, fonts and their sizes you will probably find the ideal combination that will enrich your website and improve the user experience.


